Level Viewport
This section describes how to navigate the Level Viewport so you can inspect, edit, and compose scenes comfortably. The viewport supports both quick, mouse-only navigation for casual inspection and more precise, keyboard-plus- mouse controls for editing and layout work.
Selecting objects
Selecting objects is the primary way to focus edits and transformations on specific objects in the scene. Left-click an object to select it; a dim orange outline will be drawn around selected objects in the viewport:
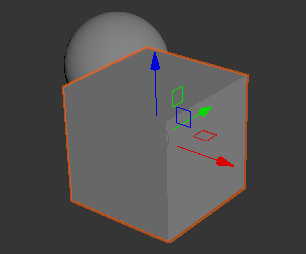
A selected cube highlighted in the Level Viewport.
If a selected object is occluded by unselected ones, Crown still highlights it with a slightly dimmed orange outline so you can keep working with it even when it is not fully visible:

A selected sphere with dimmed highlighting where occluded.
To clear the current selection, just left-click an empty area or press
Shift + Ctrl + A.
Multiple selection
Hold Left Shift while left-clicking to add unselected objects to the
current selection. Conversely, left-click an already selected object to
remove it from the selection.
To select multiple objects by area, left-click and drag to draw a selection rectangle; any object that intersects that rectangle will be selected.
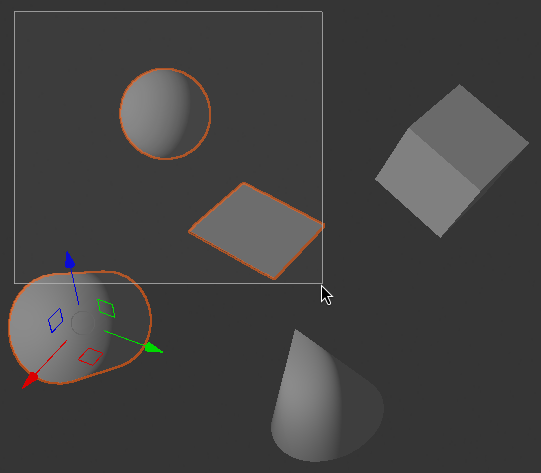
Box selection in the Level Viewport.
Framing objects
Framing centers and zooms the camera on selected objects so you can work on them with a consistent viewpoint.
Select one or more objects and press F to frame the current selection; the
camera will pan and zoom so the selected objects fill the viewport
comfortably. Press A to frame the entire scene.
Framing is especially useful before orbiting or when you want to set a stable interest point for subsequent camera manipulations.
Placing objects
Place content into the scene by entering place mode or by dragging units from the Project Browser.
Press Q to enter place mode; the cursor then becomes a placement tool and
a chosen unit can be spawned with a mouse click. If no unit is selected for
spawning, clicks have no effect. At any time, press Esc to exit placing
mode: Crown will enter the tool that was active before entering place mode.
Dragging a Unit directly from the Project Browser into the Level Viewport automatically selects the Spawn tool and sets the dragged unit as the current spawn candidate.
Click the Left Mouse Button to place the unit. By default Crown raycasts
from the camera origin through the mouse cursor to determine the Z height
where the unit should be positioned. If you click and hold the Left Mouse
Button, then move the mouse, Crown will place the unit at any XY location
on the horizontal plane defined by the height where you first clicked. This
lets you position objects precisely along a fixed elevation.
Moving, rotating, and scaling objects
Transform objects with the standard W, E, and R keys to enter
Move, Rotate, and Scale modes respectively.
When one or more objects are selected, Crown displays a transform gizmo at the origin of the selection. The gizmo provides axis handles, planar handles and a camera-aligned handle. Interact with the gizmo using left-click and drag.

Move, rotate, and scale gizmos in the Level Viewport.
Move gizmo
Left-click and drag an axis handle to move the object along that axis.
Drag the small red, green, or blue rectangles to move the object constrained to the XY, YZ, or ZX plane respectively.
Drag the small gray circle at the gizmo origin to move the object on the plane parallel to the camera view.
Rotate gizmo
Drag any red, green, or blue arc to rotate the object around the X, Y, or Z axis.
Drag the large gray circle to rotate the object around the axis that is perpendicular to the camera view plane.
Scale gizmo
Drag an axis handle to scale the object along that axis.
Drag the colored rectangles (for example red-green to scale on the XY plane) to scale across the respective plane.
Drag the large gray circle to scale uniformly on all axes at once.
Local and World axis
Normally, gizmo axes are aligned to the local coordinate system of the selected object. That makes transforms intuitive when you want to move, rotate, or scale an object relative to its own orientation. However, when an object is rotated inconveniently, local axes can make it difficult to perform edits that must align to the scene or the world origin.
Switching to the World Axis mode forces all gizmos to align to the world
coordinate system regardless of the selected object’s local transformations.
Toggle axis mode using the Local/World Axis control in the toolbar:

Toggling between local and world axis modes.
Snapping
By default Crown lets you position and rotate objects freely. When you require
precision, enable grid and angle snapping to constrain transforms to fixed
increments. Toggle snapping by clicking the Snap To Grid button on the
toolbar:

The Snap To Grid control in the toolbar.
With snapping enabled, movement and rotation will snap to the configured grid
size and snap angle. Hold Left Ctrl while performing a transform to
temporarily disable snapping and make a single free adjustment.
Change the grid cell size or the snap angle with Ctrl+G and Ctrl+H
respectively. These shortcuts open dialogs where you can type exact numeric
values for the grid spacing and angle increment:

Configuring grid size and snap angle.
Relative and Absolute snapping
Crown offers two snapping coordinate modes. In Relative Snapping mode the snapping grid origin is aligned to the origin of the object being transformed; this makes the grid move together with the object and is convenient for local adjustments.
In Absolute Snapping mode the snapping grid is fixed at the world origin, which is useful for aligning multiple objects to a common global grid.
Switch between the two modes using the Relative Snap and Absolute Snap
toolbar buttons.

Relative and absolute snapping controls.